Pour yourself a cup of coffee, get comfortable, and let me ruminate for a little bit on our first DNF. It was the 30-hour Atomic race, our first attempt at a race lasting more than 8 hours. It was night and we were trying to locate a control in a reentrant. Not being very good at navigation, and not wanting to lose our reference point, I had Ana stand at the top of a knoll with a flashlight while I searched the 30 or so tiny reentrants that surrounded us. Knowing that I could just look back at any time and see Ana’s light, I wasn’t paying any attention to my compass. But, then it started to downpour and visibility became nil. I could no longer see Ana’s light and I had no idea which direction to go to get back to her. In two seconds I went from knowing where I was to being lost and not being able to find my team. I yelled for Ana, but she couldn’t hear me over the rain.
Don’t believe me? Go try it sometime. The next time it rains, go in the forest and yell for all your worth. I like to do this anytime Ana tells me she wants to repaint the house. It’s crazy how therapeutic it is. It’s also amazing how no one can hear you. Your voice just doesn’t travel well in the woods, especially during a downpour.
It wasn’t until after the rain stopped that I could finally hear Ana yelling for me. Thank god she hadn’t moved from her spot or we would have really been in trouble. I finally spotted her flashlight and made my way to the top of the knoll, where she asked me if I had been crying. I told her of course not, it was just rain washing the mud off my face. It was a scary feeling indeed, and while I can share many more stories of us getting lost, no one has enough time to read them all.
So, why am I telling you this? It’s because I want you to think about one piece of lowly gear that a lot of people overlook, your whistle. It’s mandatory gear in every race I’ve ever been in. In the past I would have just gone to Walmart and picked up any old whistle in order to comply with the rules, or relied on the one that came with my backpack. But, those are crap and mandatory gear shouldn’t be crap.
Imagine your team is bombing a downhill at night and the last rider goes over a ledge. You may not even realize it at first. It’s happened with us on a training ride and it was three or four minutes before we even knew we lost a teammate. We’re not inconsiderate jerks, it’s just that it’s hard to look behind you when you’re going downhill, even as slow as we are. We know of other teams where someone has fallen off of a railroad truss and needed assistance.
There is no quicker way to bring help then by alerting your team, or other racers, with a super loud whistle. And the best whistle out there is made by ACME Whistles.
Now look, don’t get upset thinking that you just got sucked into reading a commercial for ACME Whistles. I’m only sharing this with you because I love our blog readers and I want you to be safe out there. Stuff happens when you’re in the wild, and it can get serious very quickly. Don’t peg your hopes on crap gear. Spend five bucks and get yourself and your team members a quality whistle.
We have the ACME Tornado 636 for our PFDs and the ACME T2000 for our backpacks. How loud are these thing? How about 117dB for the 636! What’s a dB? I don’t know, and it doesn’t matter. What matters is that 117dB is louder than if you were standing 3 feet from your car horn and someone honked it at you…in other words LOUD! And that’s what you want. Loud, dependable, and Day-Glo green (because that’s the best color ever). Actually, they make lots of different colors, so get your favorite.
As a thank you for making it through another rambling post of mine, like the post on Facebook by midnight on 5/10/17 and we’ll choose four people to send a free whistle to. We’ll even cover the postage. How cool is that?
Dude, I get it. Adventure Racing is not a mainstream sport. Most of your buddies have never heard of The Best Damn Sport Ever Created™ (Yeah, I made that up and trademarked it.) What I don’t get is why teams want to look like they just rolled out of bed, threw on the first t-shirt they picked up off the floor, and accidentally rolled into the starting line of a race.
Our local 4-year old soccer team has uniforms. The local bowling league has uniforms. Hell, half of the damn tourists at Walt Disney World have matching outfits.
Come on people! You are adventure racers, you are athletes, most importantly you are part of a team! You wanna be a team, look like a team!
Shirts. These days it can be really tough to find matching shirts with a Walmart on every corner and an Amazon on every computer. But, if you’re up for the challenge, I think you can do it. Better yet, step up your game and head over to our favorite place, Logo Sportswear. Custom apparel, fast turn around, no minimum orders. Inexpensive and good. What more do you need? Did I get you psyched and now you want custom hats, jackets, and polos? They got all that and a bag of chips! Maybe not the chips, sorry, I got a little excited there.
Accessorize. Yeah, you read that right…accessorize! Don’t judge me, bro. Matching water bottles, compression socks, headbands, whatever. There are 20 different colors of duct tape for goodness sake. Pick a team color, any color (except lime green of course) and then accessorize.
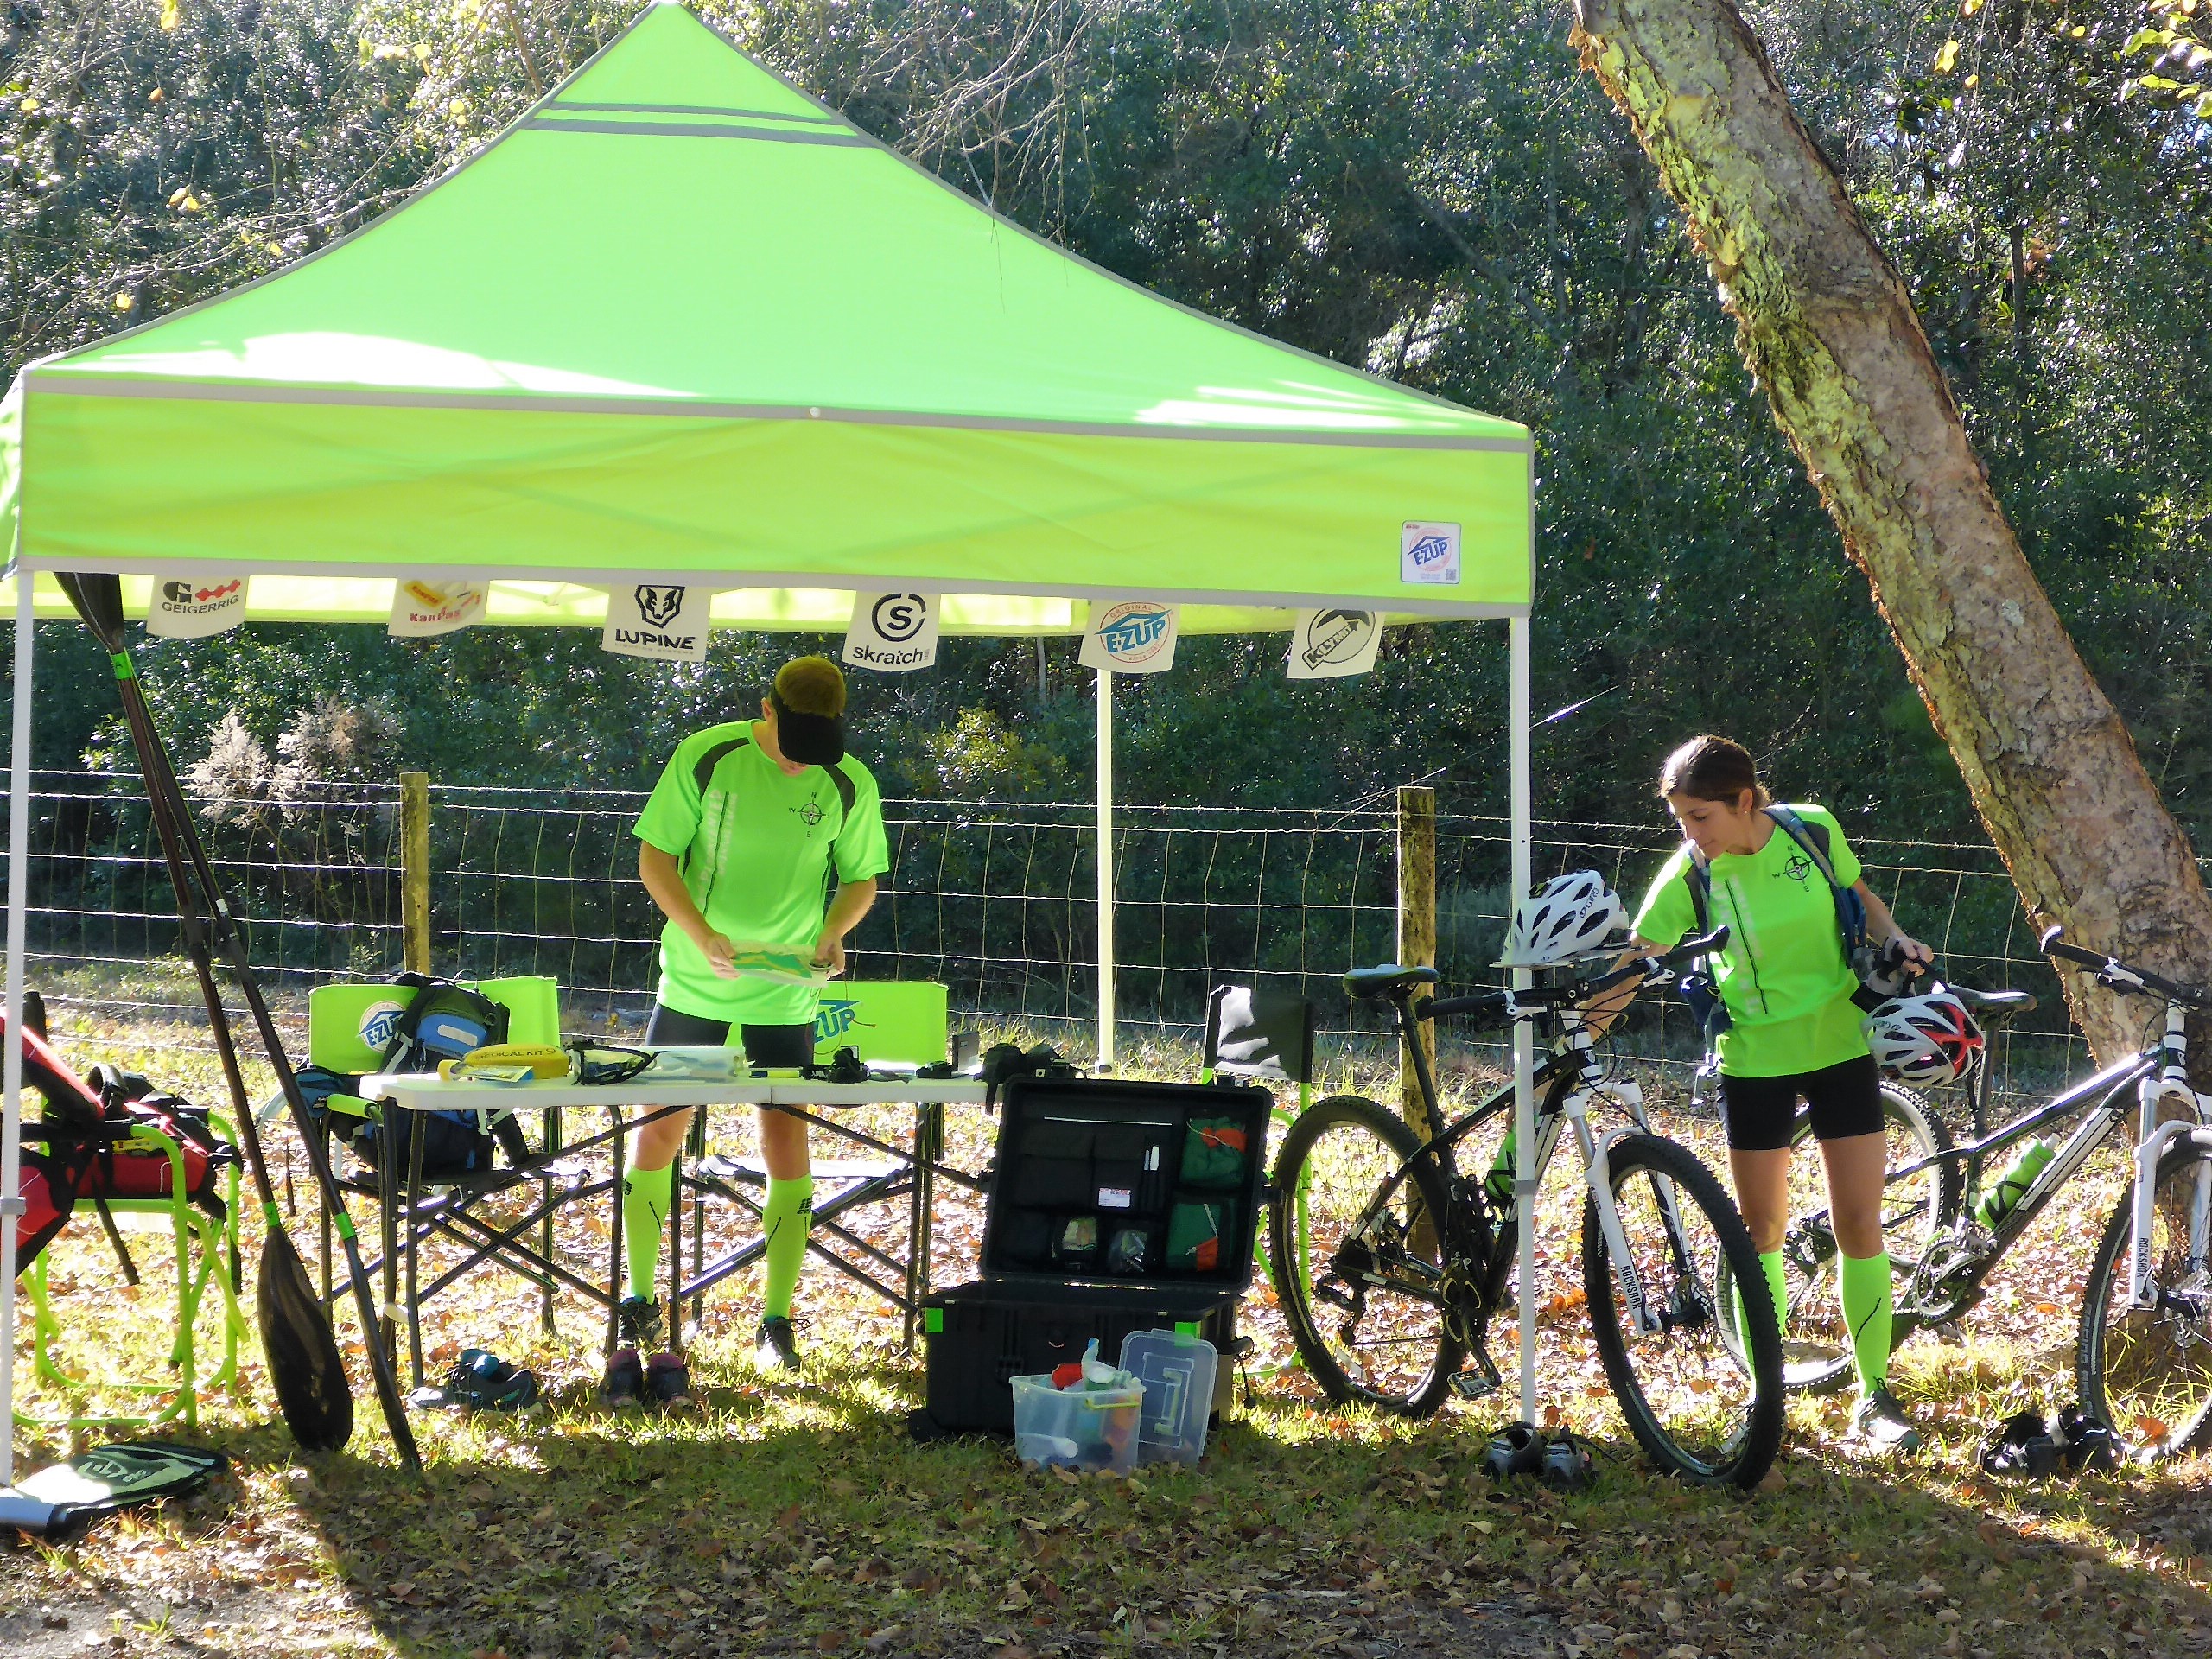
Getcha a sweet ass canopy from E-Z UP. They’re inexpensive, indestructible, and made in about any color you can imagine. And guess what, it rains and the sun is hot. Want a dry place to do your pre-race planning while everyone else gets soaked? Done! Want to chill in the shade with your team and a cold one post-race? They gotcha covered. Don’t want to go all fancy dancy with matching colors? That’s cool, they make them in basic black. Are you a super duper awesome race team or race company looking for custom printed graphics? They can handle that for sure!
Put it all together and you get, Boom!
More poseur than pro? Sure. But I’m cool with that. If for a few hours out of the month I can pretend to be half as good as Nathan Fa’avae, Kyle Peter, or Robyn Benincasa, count me in. Aren’t we all poseurs anyway? I see you strolling around town in your Dan Marino, Miami Dolphins jersey.
One, you picked a crappy team. Two, you’re in the wrong decade, maybe even the wrong century. Three, it’s okay. You want to be a part of something bigger than yourself, part of a team. That’s why you got into this. Adventure racing is a team sport. Get out there and look like a team!
Let’s talk hydration packs. Yeah, yeah I know it’s not sexy like a new carbon fiber 29er. But, as everyone knows, hydration is the key to racing success. Like many, my first water bladder came with my pack. It had some funky screw on cap, was a mess to fill and an absolute pain to clean. When I bought my MS-1 pack from OutThere it didn’t come with a hydration bladder, so I had to go looking for one. I knew I wanted something bomb-proof. I’m all about reliable gear and am willing to pay a little more for something I can absolutely rely on. Nobody wants a leaky bladder.
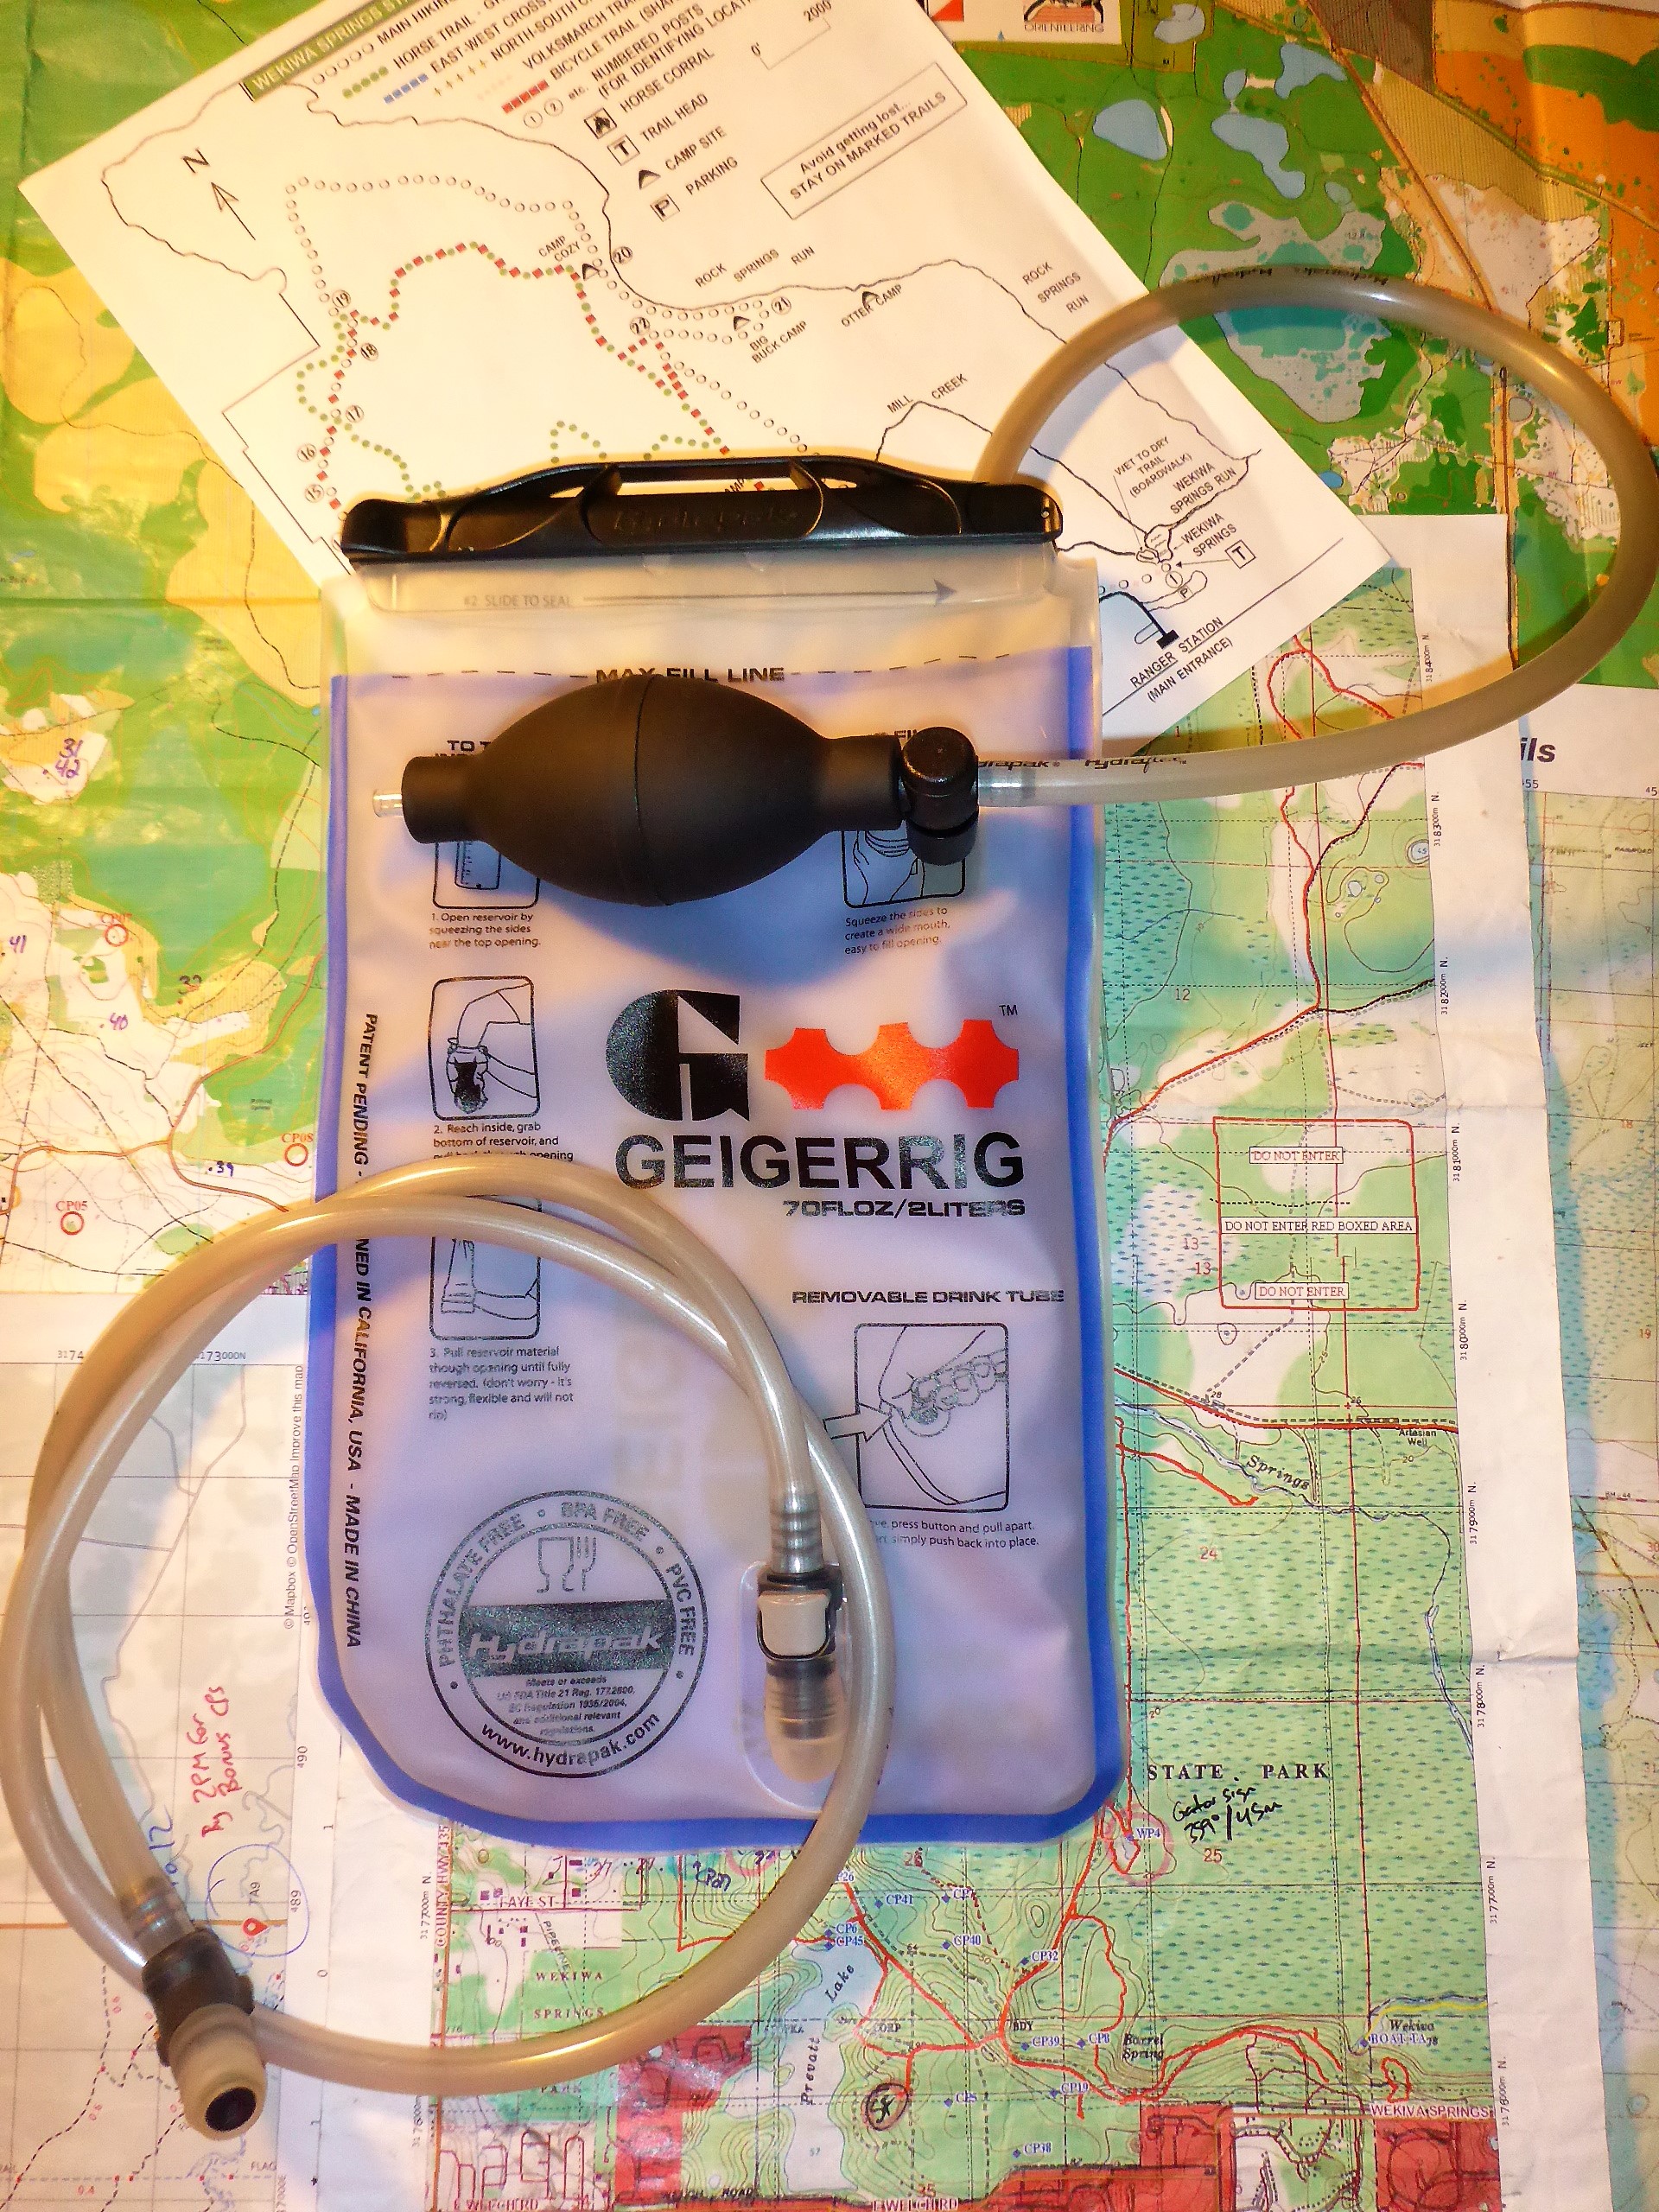
I came across GEIGERRIG, now part of Aquamira, and was instantly intrigued by what I saw. Here was a hydration bladder that was pressurized. Sounds gimmicky you say? Maybe. But think about it for a second. When I’m huffing and puffing up some gradient that only sheep and billy goats should be climbing, it’s not easy sucking water out of a hydration bladder.
With a few quick pumps of the air bladder, I can now get a stream of water. No more sucking on the hose until my eyes pop out. And, with that stream of water I can do lots of things. My teammates can now get a drink without putting their dirty mouths all over my bite valve. Hey, I race with these guys, I know where their mouths have been. Got mud in your eye? A squirt of water and boom, done! Need to rinse off your sunglasses? Need to rinse a contact lens? Need to fill a water bottle with water to add your last packet of Skratch but don’t want to take your pack off? There are a lot of times when a little pressurized water is a great thing to have.
What’s also super cool is that the hydration bladder has quick disconnects for the hoses. This means that I can remove the bladder from my pack, refill it, and not have to reroute my hoses. It also means that I can instantly add or remove GEIGERRIG’s in-line crypto or virus filters. So now you won’t have to worry if Team Adventure Medical Kits is upstream from you relieving themselves. You’ve got filtration!
“But it’s added weight!” I can hear the whining in the background. I’m kidding, adventure racers don’t whine. Sure it is, everything we carry is added weight. You just have to decide if the benefits are worth it to you. But wait, no you don’t. You see, you don’t have to have the air tube and bulb. You want to go super light and fast? Disconnect the air tube and the GEIGERRIG hydration bladder functions just like any other hydration bladder. You suck, water comes out. But I think once you give it a try, you’ll realize how nice it is to have pressurized water. Why do you think pro cyclists have squeeze bottles? Pressure, my friend! You don’t see riders in the peloton sucking water from a straw. That would be silly.
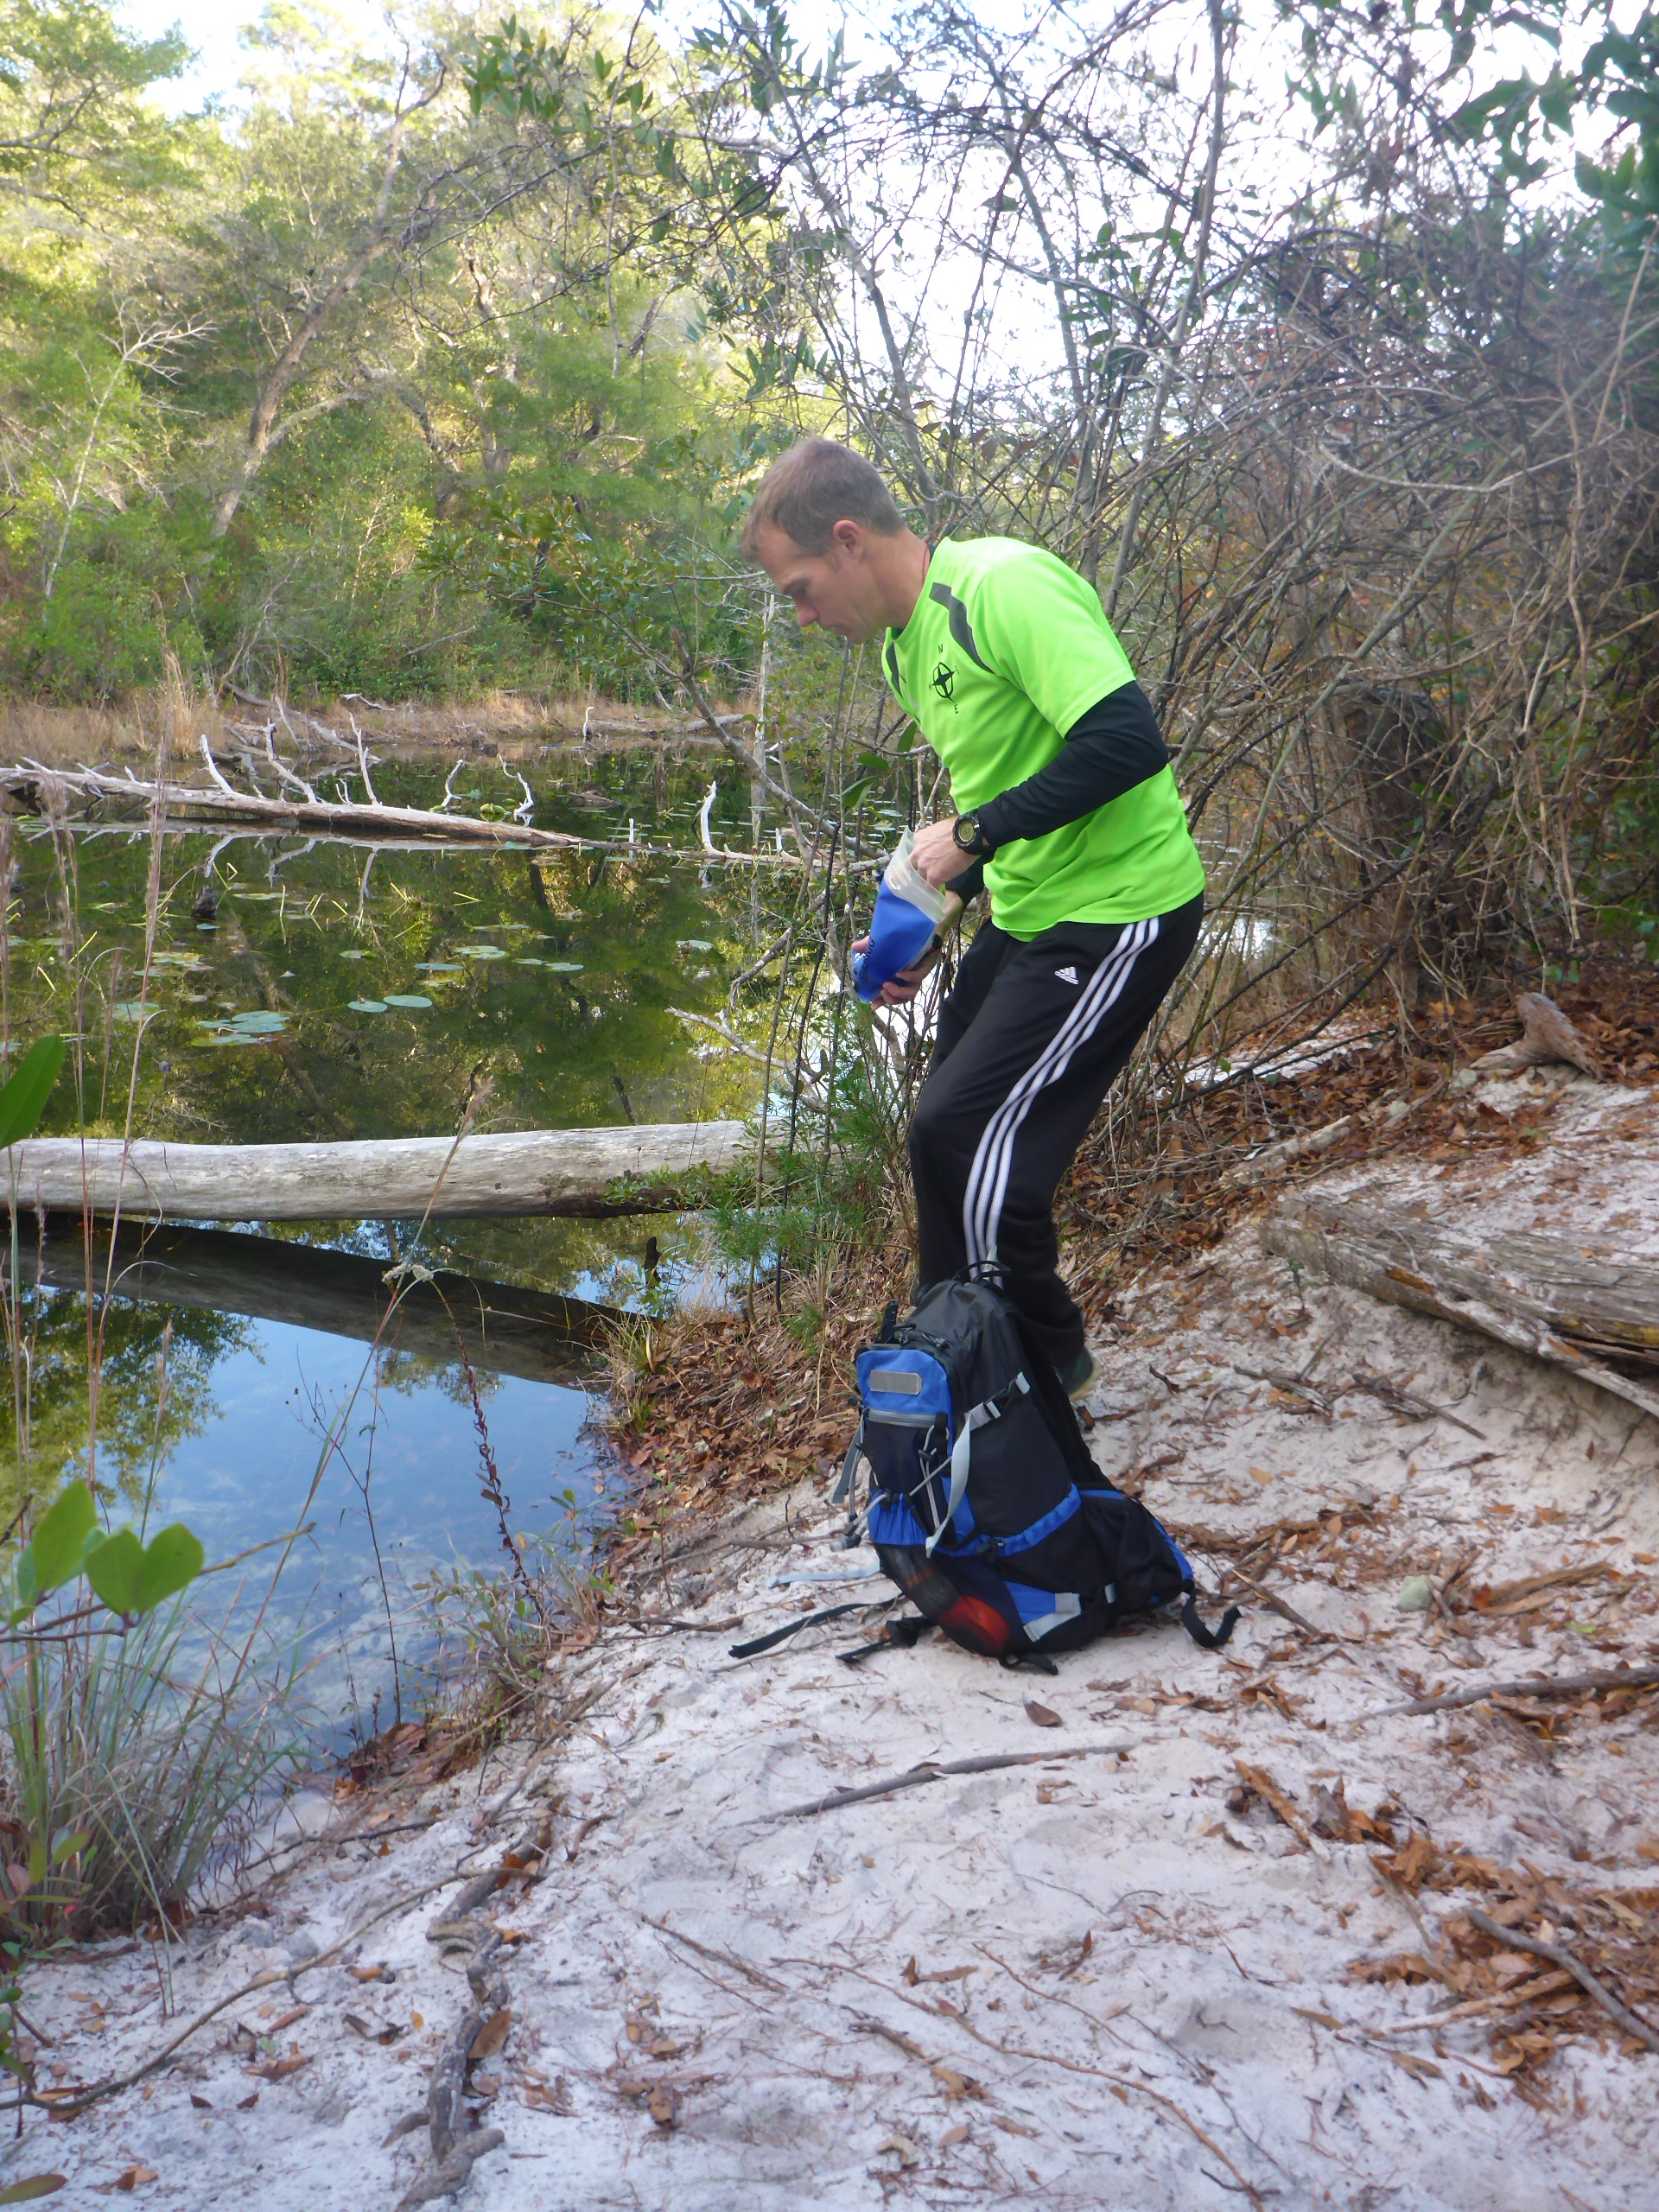
For outback races and hiking, you really can’t beat this setup. With the inline filtration and the wide mouth opening, filling the hydration bladder is a breeze.
Simply disconnect the hoses from the bladder. You can then remove the bladder from your pack while leaving your hoses installed. Then simply fill that bad boy up.
Now that 2 liters of Florida swamp water is ready to go back in your pack. Plug in your hoses, pressurize that puppy, and get ready to enjoy filtered goodness.
In 20 seconds you’re back on the trail and best of all you’re not waiting 20 minutes for your iodine pills to flavor your water. You do like the taste of iodine, right?
Best of all, once you get back home, turn that bladder inside out and throw it in your dishwasher. It’s dishwasher safe my friend. Who wants to come home from a 3-day race and scrub out a hydration bladder? That’s right, no one.
There you have it. If you need a hydration bladder, check out the GEIGERRIG Hydration Engine Video. And, if you’re looking for a hydration backpack, they have those as well. Got questions? Drop us a comment below. We’re always happy to discuss our race gear. If you’d like to check out more reviews by the pros who know, check them out here:
I never sleep well the night before a race. Maybe it’s the thought of getting lost in the woods, or being chased by bears, or eaten by alligators. Maybe it’s the thought that we’ll run out of dark chocolate peanut M&Ms…who knows. All I know is that it’s not because of our air mattress. About a year ago, we got two KlymitStatic V Recon air mattresses on a recommendation from our friend, and we couldn’t be happier.
These things are light, inexpensive, extremely comfortable and durable. Pair it with a Klymit Cush Seat and you have a portable sleep system you can take anywhere. Plus, the seat can be used for…well…a seat! As in providing a little padding on the posterior for those 6 hour canoe sections. On long races, we pack the Cush Seat and the Static V in our gear bins, since they pack down to nothing. For the 72-Hour Florida Sea to Sea, they were priceless. After 48+ hours of non-stop racing, you tell me how sweet this setup was #SleepAnywhere
Sometimes the race location is so remote that we end up primitive camping the night before. Add the Static V, a couple of 30A Beach Blonde Ales, and it’s nighty night time until race start the next morning.
We opted for the non-insulated version, because we live in Florida. However, for those unfortunate souls that live in colder areas, you can get an insulated one as well. The best thing is you’re not blowing up your bank account to afford one either. $55 bucks for a bomb-proof air mattress…
If you’re a savvy shopper you may even find it for less. Klymit makes a lot of other radical stuff too, like their award-winning KSB 20 degree down sleeping bag. We don’t have one yet (hint hint), but you don’t need me to review it, it was awarded the 2016 Outside Gear of the Year Award as best sleeping bag. I’m pretty sure they know what they’re talking about.
These guys & gals are innovators and their whole team consists of outdoor enthusiasts, so they know their shiznit. Seriously, it’s good stuff. We only recommend items we use consistently and trust.
One final thought for those on the fence. Sometimes we roll high class and even get a hotel the night before a race. But 3 dudes + 1 bed does not equal fun times. So, before you find yourself in an undesirable predicament…
you might want to think about a Static V air pad & sleeping bag in your gear bin. This is my typical setup and it makes any hotel floor a dream.
We were at the 2015 USARA National Championship when I had finally had it with my headlamps. Rather than resting at the cabin in preparation for the next day’s race, I was at the bike staging area wrapping my bike helmet with a Walmart bag. My cheaply made headlamp and batteries were not waterproof, not even water resistant, and they wouldn’t survive the evening’s downpour without protection. At that moment I decided this was BS and if I was going to take this racing thing seriously, then I needed to be willing to invest in better gear. First on my list was a great set of lights.
When you think about it, few things will improve your overall course speed better than good lights. For night sections, you use lights during every event: trail running, biking and canoeing. Very few pieces of gear cross all 3 of the main domains of adventure racing. So, in my book, it’s definitely worth the cost. Cheap lights are simply a frustration to be avoided. I wanted lights that I could throw in my pack and if I have to swim across a river, or hike for hours in a downpour, I don’t have to worry about them. I like gear that I can trust. There is nothing worse than bombing down a muddy mountain bike trail at night, in the rain, and have your headlamp fail on you. And if you adventure race, you know that you WILL be bombing down a trail, at night, in the rain…every race director has a direct line to the rain gods to make that happen.
So, I asked some racing buddies of mine what lights they recommended and did a few inquiries online and chose the Lupine Piko.
I’m not a professional gear reviewer, I just like sharing what works for me. If you want to hear the good remarks from the pros then check out the reviews. But here’s the skinny:
All that in 55 grams. 55 GRAMS! Oh sorry…1.94 ounces. Yeah, that doesn’t help either does it. How about this, it’s freakin’ light, like 2 slices of toast light. Yeah, I know, that doesn’t include the battery weight. But, who knows what battery size you’re going to use. You can choose either the 2.2Ah, 3.3Ah, 6.6Ah, 13.2Ah or the mack daddy 20Ah Bottle Battery. For me, when I want to attach it to my bike helmet, I use the 3.3Ah
When I’m doing night orienteering and need a lot of light for a long time, I’ll throw the 6.6Ah into my pack and run an extension cable up to my headband. This means that all the weight is in my pack and I’m kicking out 1500 lumens with only a 55 gram light on my head. So what does 1500 lumens look like?
BAMM! About like that! Oh, and did you notice the red lights on the back of the battery pack? These serve as a visual indication of the battery’s charge level so you know, before you go. They can also be set to stay on as a taillight. Not something you’re going to find in those cheap lights and battery packs.
I will say that the biggest negative for the Piko is switching between bike helmet and headband. I don’t think the designers were thinking about multi-sport applications, like adventure racing, when they designed the mount. However, there is a simple fix, and that is to get the GoPro Adapter. Once you have the GoPro Adapter, your mounting options are endless. Check out what Team Odyssey did for their Lupine Piko using the GoPro Adapter
Psyched?! Ready to go Lupine! Then contact the awesome folks at Lupine North America. Tell them Team Disoriented highly recommended them. If you have any questions on the Piko or other Lupine lights, contact Bill and he will help you out.
If you have any questions for us on the Lupine Piko, or any comments in general, drop us a line below. Oh and BTW, this isn’t a picture of us, I just thought it was bad ass!
Sometimes you spend a lot of money on a piece of kit and it turns out to be a piece of junk. Other times you spend a little bit of money and find some real treasures. KanPas compass is one of those unknown treasures for orienteers and adventure racers!
I’ve been considering getting a compass for my bike map board for some time, but I’ve held back due to cost and the fact that I have about 8 compasses already. Trying to justify an additional compass purchase gets harder each time. But, when I came across the KanPas Map Board Clip Compass at 38 bucks, I had to give it a try. In the past, I’ve used a wrist compass to aid in bike navigation, but keeping a firm grip on both handlebars is usually a wise move for me. Plus, who doesn’t like new gear?
After 75 hours of solid racing at the Sea to Sea, many of those hours spent intimately connected to a bike seat, I can tell you that the KanPas Map Board Clip Compass quickly became one of my favorite new gear items. It is fast, stable and very easy to read.
The needle is very powerful and as I rode over a bridge that had small metal plates on the ground, I could watch the needle deflect every time. Just amazing!
My search for a great MTBO compass is over! I have no intentions of using anything else while bike orienteering. The clip felt strong and attached firmly to the map board. It never felt weak or likely to fall off. I know some people like to put a baseplate compass in their map case, attached to their map board. But, I like the freedom of being able to move the compass around when I needed to uncover portions of the map.
I do have one small suggestion on improvements for this compass and I’ll try to illustrate in the picture below. As you can see, the top clip arm is blunt and can easily catch on the map board, especially if you have multiple maps on the board.
I think if the top clip arm was extended and beveled (see the red outline) it would make for the perfect map board compass. While trail riding, I don’t want to fight getting the compass onto the map board. Also, because there is a slight gap between the base plate and the top clip arm, maps can get caught in between.
These are relatively minor complaints on an otherwise excellent compass.
The same strong, fast and stable needle used for the bike compass is also used for the thumb compass. I was able to try out the thumb compass while orienteering with my family at Oak Mountain State Park permanent orienteering course.
If you’ve never been to Oak Mountain, and live in the area, it is well worth the visit. The terrain is rugged and the permanent course is a lot of fun. We’ve recently completed the permanent amateur course and advanced course. All of the checkpoints are properly marked and still exist.
During this visit, I wanted my sons to learn more about orienteering, and they both did a great job picking routes and using the compass.
There are 3 different styles of thumb compass: rainbow, degree, and clear. I chose the degree style. As we raced over mountainous terrain, I found the needle to be extremely fast, stable and accurate. I’ve been using the Moscompass thumb compass, but I like the KanPas thumb compass better because of its quick, high-visibility needle. The KanPas thumb plate is very durable and fits well in my hand. I really liked the well-defined markings on the plate, showing 100m increments on a 1:10k scale O-map.
So far, I’ve been extremely happy with KanPas compasses and currently use the following:
They all use the same compass needle, so you can expect the same high-speed, stable performance. The cost of the compasses are reasonable, but shipping directly from KanPas can be expensive.
Here’s a quick video showing you the speed and stability of the 43 needle:
KanPas is currently working on a new design, the MA-45-F, and I am very excited to try it out once it’s available.
If you have any questions about KanPas compasses, drop me a comment or email. Or better yet, stop by any event we’re at and I’ll be more than happy to let you check them out!
I like to finish a long adventure race with a post-race beer(s) which is usually followed by the post-race shower. The post-race shower is followed by the post-race tick check which is usually followed by the post-race…Oops, family blog. There are many benefits to racing with one’s spouse 😉 Anyway, usually we have come out tick free but after the 18Hr Nocturnal Challenge I found 2 ticks on Ana, and believe me, I did a thorough search. Now, we have tried tweezers and hot pins, incantations and voodoo rituals to remove these nasty buggers with their head intact, but this time we tried The Tick Key. This magical device weighs almost nothing and easily slips into a Ziploc bag containing my survival blanket and blister pads.
I, of course, bought the green one so that if I drop it in the woods it would be super difficult to find. I like a challenge ya know. I would recommend an orange colored one for those lazy people that don’t like searching for hours in the woods at night for their dropped Tick Key.
And for those that may think, “Wow, I love the Tick Key but man is it heavy!” You can even cut it down to reduce its massive size.
How does it work, you ask? Well, nothing short of magic. You fit the tick through the large hole–if it won’t fit then you have some serious tick issues and should probably seek professional medical attention. Then you slide the Tick Key under the critter, body on one side, mouth parts on the other.
A slight lever action and, pop, off comes the tick. I like to crush the nasty bastards once I’ve removed them because they’re simply disgusting. That’s it folks, super cheap, super easy. Buy one today, buy one from my link at the top of the post and I’ll actually make $0.03
I’ve been looking for some tough nylon pants to wear while adventure racing that would hold up to the demands of bushwhacking through saw palmettos. I also wanted them to be light enough to wear during the summer and quick drying. I came across Rail Riders after searching on the internet and decided to order the Men’s X-treme Adventure Pants along with the Men’s Eco-Mesh Shirt. I waited anxiously for the shipment to arrive. Since I hadn’t ordered anything from Rail Riders before, I ordered a couple of different sizes and in-seams. When the package finally arrived, I ripped into it and tried on the pants and shirt. Ana was in the kitchen making dinner and when I came out and she saw me, she couldn’t help but laugh. My ego was crushed. Here I thought I was looking like Mr. Adventurer and instead I looked like I should be swabbing the decks of some pirate ship.
Even my mom, who was visiting for the week, couldn’t contain herself. Nothing better than getting laughed at by your mother. I took a look in the mirror and was instantly reminded of the “Puffy Shirt” episode on Seinfeld.
While the puffy shirt, I mean Eco-Mesh shirt is out, I ordered a pair of the Bushwhacker Weatherpants. I like the material of the Rail Rider pants and think that they will work great, but I wanted to try a pair that wasn’t pegged at the ankle like my 90’s MC Hammer Pants. They are light weight and look to be extremely durable. As summer is right around the corner, there’s no way that I can wear the Under Armour tights that I’ve used in the past.
Once I get the Weatherpants in and use them for awhile, I’ll let you know how they work out.
I ordered a pair of the Weatherpants for Ana, but they ended up looking like mom jeans so she decided to pass.
The House of Pain, also known as the Pangea Atomic 30-hour Adventure Race, is quickly approaching and we are not ready. I haven’t trained as well as I would have liked. We haven’t canoed down any Class II rapids. I haven’t practiced nighttime navigation and we haven’t decided on the gear we need to pack. But, I did get an awesome pack–the AS-2 from Out There USA. After the Atomic, I’ll do a write up on the pack. I think it is a little too big for the Atomic but I wanted something that I could use for the 2015 Sea 2 Sea in February. That’s right Ana, we’re doing the Sea 2 Sea 🙂
So, here is a pic of what I’ve decided on to date not including food, gels, and fluids.
The longest race we’ve done so far has been 10 hours so we are jumping in pretty deep to do the Atomic. The thing is, we don’t know how to pack for a race of this duration. In an attempt to adhere to the Adventure Racing Manifesto:
If you’re not hungry, you’re carrying too much food. If you’re not thirsty, you’re carrying to much water. If you are warm, you have too many clothes. If you’re not wet, scratched, and bruised, you took the long way. If you are not frightened, you have too much gear. If you are not tired, you’re going too slowly. If you are not drop-down sleepy, you’re getting too much rest. And if you finish the race on schedule, it was too easy anyway.
We’re trying to pack as light as we can, but not stupid light. The race is in Blue Ridge Georgia and the average weather is High 80F, Low 50F with a record high of 94F and a record low of 29F. The average monthly rainfall is 5 inches but the recorded rainfall to date is almost 0 inches, so I’ll bet my chafing ass that all 5 inches will be coming down the weekend of the race.
I’ve looked online for packing lists to get an idea of what to bring and here are a few links worth checking out:
With all of those sources, I put together my list of what I think will work for us. My biggest concern is hypothermia. I was stationed at Eglin AFB when 4 Army Ranger candidates died due to hypothermia. According to the Associated Press, “the water temperature was 52 degrees, just above the 50-degree threshold set in 1977 after two soldiers died from hypothermia during Ranger training. The air temperature was in the 60’s after several days of chilly weather.” In other words, it wasn’t frigidly cold. Wet clothes, little food, fatigue and exposure and hypothermia becomes a real threat.
So, with all that in mind, here is our evolving gear list:
If you have any suggestions, please leave us a comment. We’d love to hear from others, especially if you’ve done the Atomic. One thing I’m going to try that I’m not sure about is, rather than getting a large dry bag for my backpack, I plan to pack all of my extra clothes in a small dry bag that I’ll leave in my pack. The rest of the contents can get wet without damage. I know some racers shove their entire pack in a dry bag during the canoe portions. I’ll have to think more on that.
I’d like to thank Hien from the Canyoneros and also Emily Korsch for their gear suggestions.
For those that don’t like to read–who needs all those words anyway–you can click on the link below and see a short video of our course. I recommend clicking on settings and watching at 0.25 speed to slow down the video.
For those that actually enjoy reading my blogs, well you are obviously above average in intelligence and attractiveness so you shall be reward by a blog post full of information and wit. It’s full of something for sure.
The 2014 Pangea Dixie Conquest was hosted at the Bayard Conservation Area, a beautiful area that is above water 364 days out of the year. However, once a year the entire area turns into a swampy mess, and that’s usually when Greg schedules the Dixie Conquest. This was the toughest race we’ve done so far. It took us 9 hours of constant effort to cover the 36 miles by running, biking, and canoeing. And I’m pretty sure we could have cleared the entire course with just a canoe. I have never seen a race as wet and swampy as this one and I have pictures to prove it…oh wait…no I don’t because we forgot the GoPro. Boo! But that’s okay because I can just hijack the Canyoneros YouTube video…
For those not familiar with adventure racing, clearing a course means that a team has found all of the checkpoints and checked in prior to expiration of time. This is our 4th race and the first time that we’ve been able to clear a course, a big milestone for us.
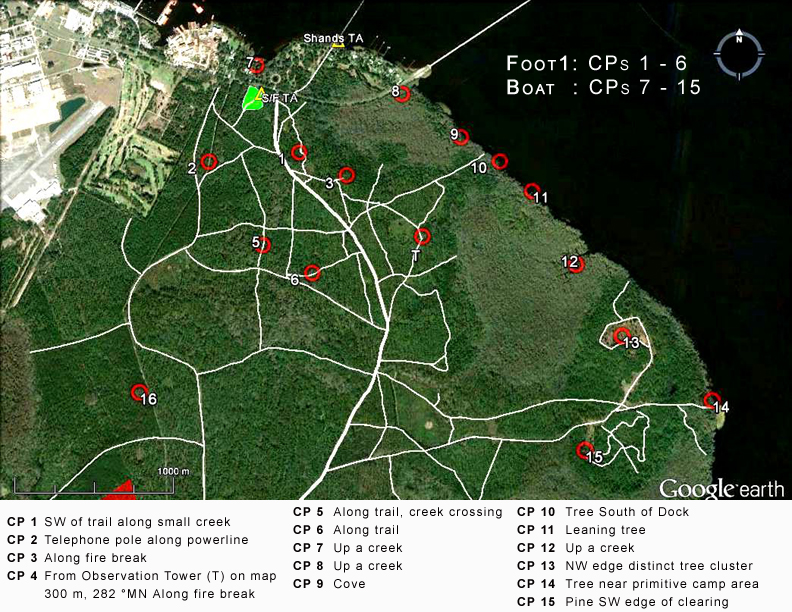
For those interested, here are the course maps and instructions:
Jeff Leininger, course designer, had the teams gather in a small circle prior to the start of the race. In order for us to get our first set of maps, each team had to find 4 hidden Easter eggs and turn them in at the Start/Finish table. This was a great way to break up the racers and a lot of fun.
Foot 1:
We gathered our eggs and were off with the front of the pack. Our original plan was to first go to CP2 then CP5, but when we saw the leaders heading off towards CP1, we decided to follow. I actually don’t like following other teams except in the beginning of a race. For some reason I have the hardest time getting oriented right at the start and I’ll usually follow the herd for the first checkpoint or so. This first foot section was straight forward and we didn’t have any issues finding the CPs. Our order was 1, 3, 4, 6, 5, 2 and then back to the Start Finish where we got our bikes and paddles and headed to the Boat TA.
Boat 1:
Since canoeing is our worst event, our plan was to go SE towards CP8 first so that we could maximize our points. If we decided we were taking too long on this section, we would bail out leaving CPs 13, 14, 15 and 7 behind. Given the pre-race forecast of high winds and rain, this approach made sense. But, when we got to the Boat TA, the water was calm so we decided to go for it all and headed towards CP7. On the way, we got to canoe under a number of piers where we had to duck to make it. You can tell Ana is a little nervous as she’s already in full tuck mode.
One thing that worked well for us on this race was measuring distances between the canoe checkpoints and converting the distances to estimated times between CPs. Had we not done this, we would have had a much harder time finding the CPs. This was my first time using the Scale Master Pro Digital Plan Measure. This tool is awesome.
You can set up a custom scale and then just roll out your measurements. I’ve found it to be extremely easy to use and very accurate. If you don’t have one, get one. And if you’re going to get one, do so by clicking on the pic above and Amazon will send me a quarter. You’ll get an awesome tool and be supporting the awesomest adventure racing team at the same time.
After CP7, we hit CP8, 9, 10, 11 without any problems. CP12 was further into the creek than we imagined and we were passed by Team BikeWorks / Gecko when I took an offshooting creek. We quickly got back on track and found the CP. For CP13, 14, and 15, we planned to beach near the trail by CP13 and do the remaining CPs on foot. We never saw the trail from the water but beached where a number of other canoes were and bushwhacked south until we found the trail. We quickly picked up the CPs and made our first major blunder returning to the canoe. We couldn’t remember where we came in and so the plan was to find the trail leading to the water and then follow the shore to the canoe. We found the trail but there was no way to follow the shore south without a major swim. So, we headed back to the loop and picked a point of reentry. This detour probably cost us 10 minutes. Back on the canoe, we “raced” back to the Boat TA having cleared our first canoe section without capsizing…double bonus points. Team BikeWorks was right behind us and they caught us at the take out point. I swear they had an outboard or something.
Bike 1:
Finishing Boat 1, we were given new maps at the Start/Finish TA and began Bike 1. We first attacked CP16 and I made a big navigational error that cost us another 10 minutes. CP16 was along a utility line easement and I had measured the distance from where the trail branches away from the easement (Point A) rather than where the easement crosses an adjoining trail (Point B). We started down the easement at Point B and so we paced out 300 meters placing us 120 meters shy of CP16. The clue was “Cypress Swamp” which was useless since I couldn’t tell a cypress if I ran into one. Don’t the race guys know there are two types of trees in Florida, pine trees and everything else. Anyway, we almost gave up on CP16 but stuck around a little bit longer and finally found it. I felt relieved as I really wanted to clear all the CPs.
We then hit CP17, 18 and 19. We found these without any problem although I believe they were not marked correctly on the map. Post race analysis showed that they were plotted about 150m more westerly than they actually were (see the Canyoneros blog post). Since I assume my measurements are off, we started looking for a creek once we got close to the estimated attack point. This worked well for us on this race. At CP18 we ran into BikeWorks again. They decided to bushwhack or swampstomp from CP18 to CP19 while we decided to bike around. Both paths proved to be about equal as we ran into them just as they were coming out of the swamp on the trail just north of CP19. From CP19 we hit CP22, 20, 23, 24, 26, 25 and 21.
Our path choice proved to be a bad decision because the path from CP26 to CP25 was completely underwater. It was a 700m trudge through knee-deep algae filled muck that had us cursing for 15-20 minutes. After finally reaching the fork, we stopped and had to clean our deraillers, chains, and brakes of swamp slime before we could proceed. A better route from CP19 would have been CP24, 26, 20, 22, 25 and 21. Aah, the beauty of hindsight.
Right after clearing CP25 the Canyoneros came upon us as I was struggling to figure out which way to go on an unmarked fork in the trail. Eventually I will realize that not every trail is marked on the map and to not be distracted by this. The Canyoneros sped off to the west and since I didn’t know where they were going, we went off to the east until I got my bearing. Luckily it didn’t take long as we ran into the train tracks and had to turn around. Crisis averted, we collected CP21 and were off to Foot 2.
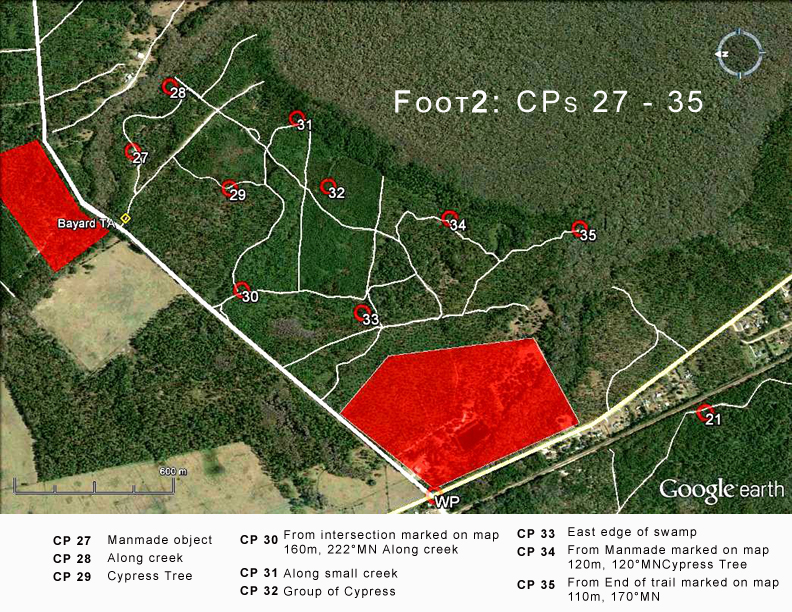
Foot 2:
Our plan for Foot 2 was to hit CP27, 28, 31, 29, 32, 34, 35, 33, 30 and then exit to the main road for a quick run back to the Bayard TA. We stuck to this plan and cleared most of the CPs without much issue. CP28 was a little difficult as we went up the wrong creek and had to backtrack to find the CP. The whole course was flooded so it was pretty easy to chase up the wrong creek. My biggest mistake on this section was right after punching CP29. We were supposed to head back the way we came from CP31 and then follow a new trail to CP32. However, we ran across another team and for some reason instead of stopping to consult my map at the intersection I just followed them. They were heading to CP 30, which we were saving for last. Once I realized this, we had to make a decision to continue on to CP30 or backtrack to stick to our original plan. We decided to backtrack and probably lost 5-7 minutes here. The other major blunder on Foot 2 was at CP34. We found the CP without any issues but I got turned around coming back to the trail. I think my brain was exhausted by this time and I couldn’t figure out how to get back to the trail from the CP. Another wasted 5-7 minutes here.
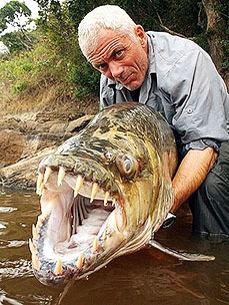
CP35 was true adventure racing for us. Ana usually punches the card so that Stu and I can review the map before taking off again. Once we spotted the marker for CP35, Ana went to punch it. After a few seconds she called for us to come over because she needed help. We came over and saw that the marker was across a creek that had turned into a river due to the flooding. I took the punch card and started to go across the creek and it kept getting deeper and deeper. The water was up to my armpits and my feet were sinking in the mud and I’m thinking, “Dear Lord, I don’t want to be eaten by something!” I’ve watched ‘River Monsters” and I could imagine Jeremy Wade fishing for whatever had decided to eat “that poor adventure racer from Niceville, Florida.”
Finally, I was able to grab hold of a cypress knee and pull myself out of the water just as another team found a much shallower way to get to the checkpoint. Well, I bet you can guess which way I took to return to the other side. It was fun. I don’t want to do it again. We collected the remaining CPs and hit Banyard TA where we transitioned to bikes for the mad dash to the Start/Finish.
Finish:
At Bayard we turned in our punch and I see the Canyoneros finishing Foot 2 as well. Oh crap! Race On! We scramble to get our bikes and head out. I want to beat these guys to the finish but I don’t have my maps arranged and shortly after hopping the fence to get on the trail to the Finish TA, I have to stop when I come to a fork in the road and am unsure of which way to go. I hear Hien in the background yelling at me, “Why are you stopping!” and I yell back, “Because I don’t know which way to go! I haven’t been here before!”
Once they pull ahead I say screw it and decide to follow them in. There’s no way we’re going to pass these speed freaks anyway, so we just follow. We’re pedaling our hearts out to stay with them and they’re pedaling their hearts out to make sure we don’t pass. It was funny in a twisted kind of way that I can laugh about now but not then with my legs cramping. Well wouldn’t you know it, they took a wrong turn and I followed them right into it. My teammates had stopped at the correct turn but I didn’t know it. Too bad I didn’t just follow those stupid red arrows pointing us back to the finish line. In the end, the Canyoneros beat us by a few seconds but we didn’t care, we had put on a good race and had about as much fun as possible. We met some really cool racers and had a lot of fun laughing it up with them while trying to perform our best. We learned a lot and improved from last time. Who could ask for more?
Post Race:
During this race we learned some new adventure racing terminology that we thought to share for the novice racer:
“Large Pine” or “Large Oak” = average sized pine or oak that will look like every other pine or oak in the vicinity of the CP
“Faint trail” or “Old trail” = forested area that will not look like a trail by anyone’s imagination
“Clearing” = swamp
“Creek” = swamp
“Cypress swamp” = swamp
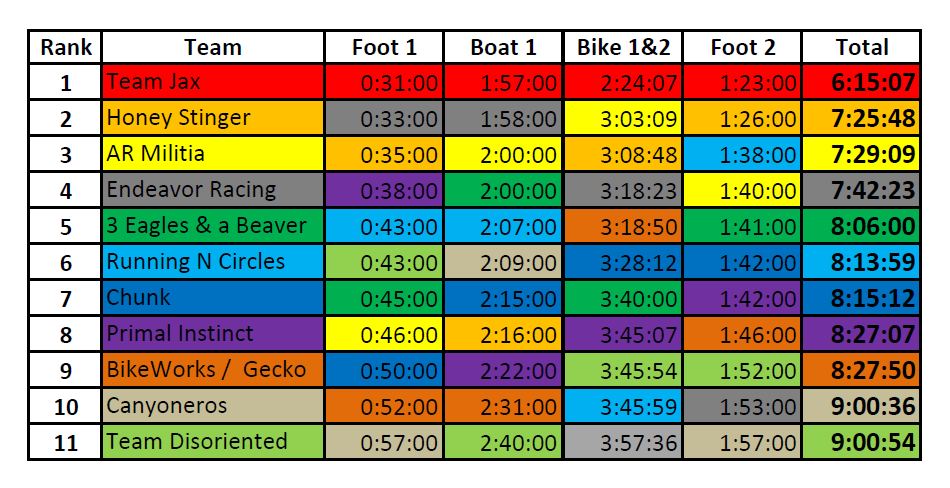
In conclusion, I was really pleased with the way the team performed. We stayed better hydrated and fueled during the entire race. We didn’t capsize. We pushed pretty hard throughout, except when we got chatty with the other racers, and some of our navigation was pretty decent. Below is a capture of the split times for the teams above us. Yes, I know, it is a kaleidoscope of colors but take a moment and let your eyes adjust to the rainbow and I think you’ll be able to see what I was trying to capture. Each team has its own color and each section is arranged in order of time (least to greatest). So, Primal Instinct (Purple), finished 8th overall, completed the foot 1 with the 4th best time, Boat 1 with the 9th best time, Bike 1&2 with the 8th best time and Foot 2 with the 7th best time. See, now wasn’t that fun and easy? Team Jax was first in everything but those guys are on crack so I don’t really count them 😉

 Pour yourself a cup of coffee, get comfortable, and let me ruminate for a little bit on our first DNF. It was the 30-hour Atomic race, our first attempt at a race lasting more than 8 hours. It was night and we were trying to locate a control in a reentrant. Not being very good at navigation, and not wanting to lose our reference point, I had Ana stand at the top of a knoll with a flashlight while I searched the 30 or so tiny reentrants that surrounded us. Knowing that I could just look back at any time and see Ana’s light, I wasn’t paying any attention to my compass. But, then it started to downpour and visibility became nil. I could no longer see Ana’s light and I had no idea which direction to go to get back to her. In two seconds I went from knowing where I was to being lost and not being able to find my team. I yelled for Ana, but she couldn’t hear me over the rain.